Replicating a Universal Profile Across EVM Chains
How to deploy your existing LUKSO Universal Profile at the identical address on another EVM chain — and why it works.
What this is. Your Universal Profile (UP) was created on LUKSO through a deterministic factory contract. Because the factory is deployed at the same address on every EVM chain, replaying your exact original creation transaction on another chain produces a contract at the same address there too. This page explains the mechanism and walks through doing it safely, using the companion tools linked at the bottom.
This is a technical procedure. It assumes you're comfortable with MetaMask, smart contracts, and reading a block explorer. It is not a "one click" consumer flow, and it shouldn't be treated as one.
How the address is actually generated
It is not a simple function of "controller + salt". Your UP was created via LUKSO's LSP23LinkedContractsFactory, deployed at the same address (0x2300000A84D25dF63081feAa37ba6b62C4c89a30) on every chain where LUKSO has published it. The factory call includes:
- an initial salt,
- the implementation and initialization data of the Key Manager (the second linked contract),
- the address of a post-deployment module and its calldata — this is where it is actually specified which address receives
ALL_PERMISSIONS on the new profile.
All of this is hashed together (keccak256) to form the real salt used in CREATE2, combined with the hash of the minimal-proxy bytecode pointing at the Universal Profile implementation. The resulting address depends on the entire original transaction — not on any single field in isolation.
This is why only the exact original calldata reproduces the same address: the controller with full control isn't special on its own — it's simply the address that particular calldata already names. Change the calldata (even to name a different controller) and you get a different address entirely.
Step by step
1
Extract your private key
You'll need this key later, in step 8, to operate your profile on the new chain — it's simplest to get it out of the way first. Unlock the Universal Profile browser extension, click the gear icon (Settings) top-right, scroll all the way down to the Developer section, and click Reveal private key. Enter your extension password when asked, and the key is shown as plain text.
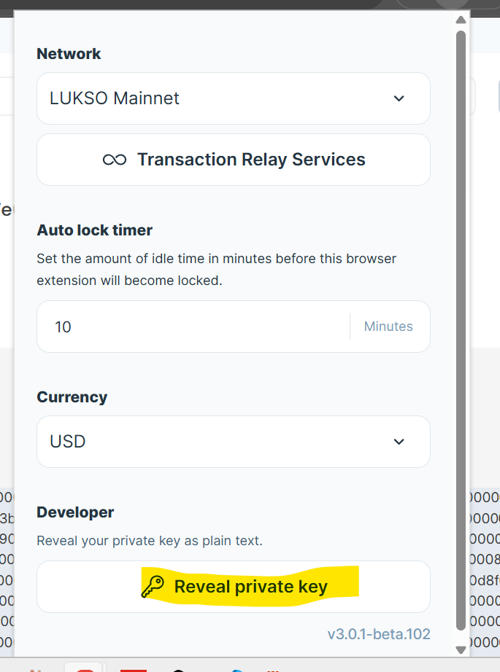
Settings → scroll to "Developer" → "Reveal private key".
This key is your profile. Whoever has it owns your Universal Profile — on LUKSO and on every chain where you redeploy it — and can move every asset it holds, change its controllers and lock you out. There is no recovery and no one can reverse it.
- Never type or paste it into a website — including this one and the tools linked here: none of them will ever ask for it. The only place it goes is the "import account" screen of your own wallet, in step 8.
- Never send it to anyone: not in chat, email, Telegram, Discord or support tickets. Real support (ours included) will never ask for a private key, seed phrase or backup password — anyone who does is trying to steal your funds.
- Don't store it in plain text: no screenshots, photos, notes apps, documents, cloud drives or messages to yourself. Keep it only in a password manager or offline (on paper, in a safe place).
- Handle it on a trusted device only: not on a shared or work computer, and not with screen sharing or remote-desktop sessions open. After copying it, clear the clipboard (copy something else) and close the extension panel.
- If you think it has been exposed, act immediately: move your assets to a safe account and replace the compromised controller (add a new one, then remove the old one) on LUKSO and on every chain where the profile exists — each chain has its own permissions, a fix on one does not protect the others.
2
Find your UP's original creation transaction
Open your UP's address on the LUKSO mainnet explorer, on its Details tab. Find the Creator row — it shows the creator's address "at txn" followed by a transaction hash. Click that transaction hash link: it takes you straight to the creation transaction.
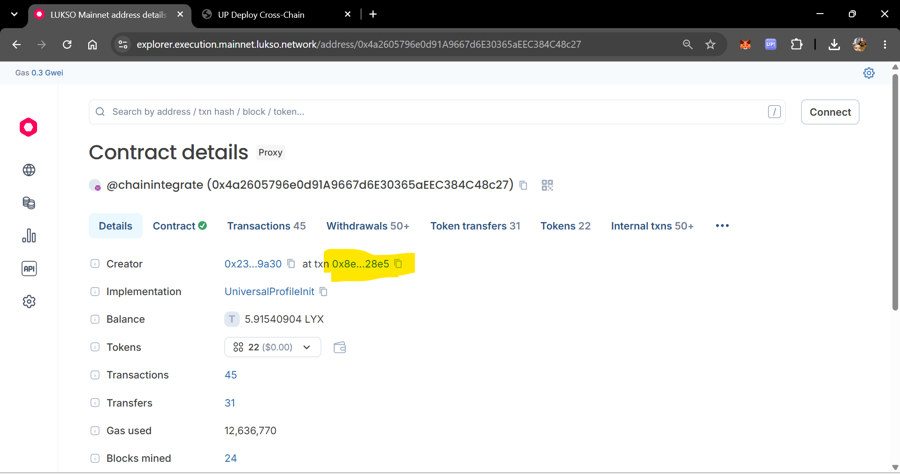
On the Details tab, the "at txn" link next to Creator is the shortcut straight to the creation transaction — no need to scroll through the transaction list.
Once you're on that transaction's page, switch to its Raw trace tab.
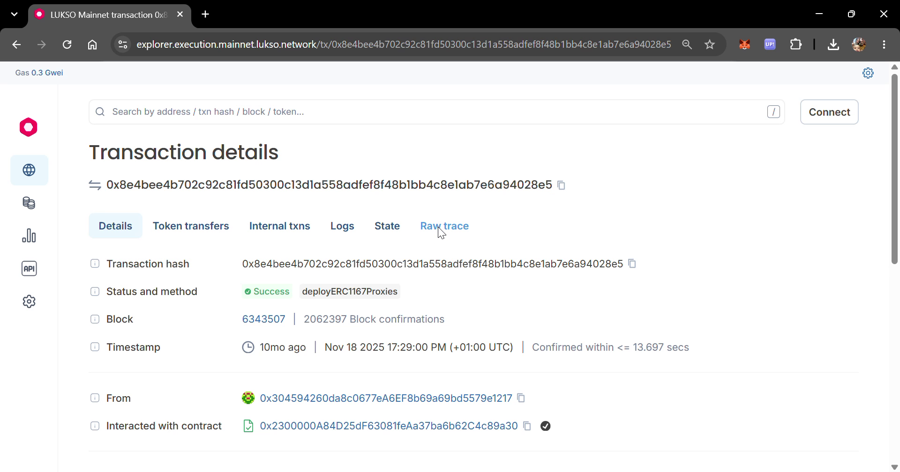
The creation transaction: method deployERC1167Proxies, sent to the factory address. Open "Raw trace" from here.
This is public on-chain data. You don't need your wallet's backup file or any decryption to get it — anyone can look up any UP's creation transaction.
3
Copy the transaction's input data
In the raw trace, find the call field (the raw hex, starting with 0x6a66a753...). Copy the whole string. This is your deployment calldata.
Tip: double-click anywhere on the hex string to select it entirely, then copy — much faster than dragging to select such a long string.
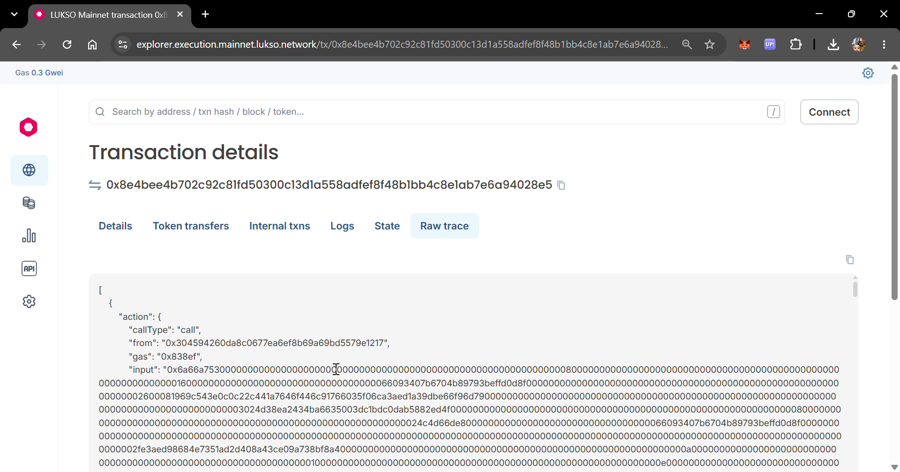
The raw trace: the call field is the deployment calldata.
4
Connect your UP to the Deploy tool
Open the Deploy tool and click Connect your Universal Profile in panel 1. Approve the connection in the extension popup — this only reads your address, it never asks for a private key. Once connected, the tool shows your address and pre-fills the "expected address" field with it.
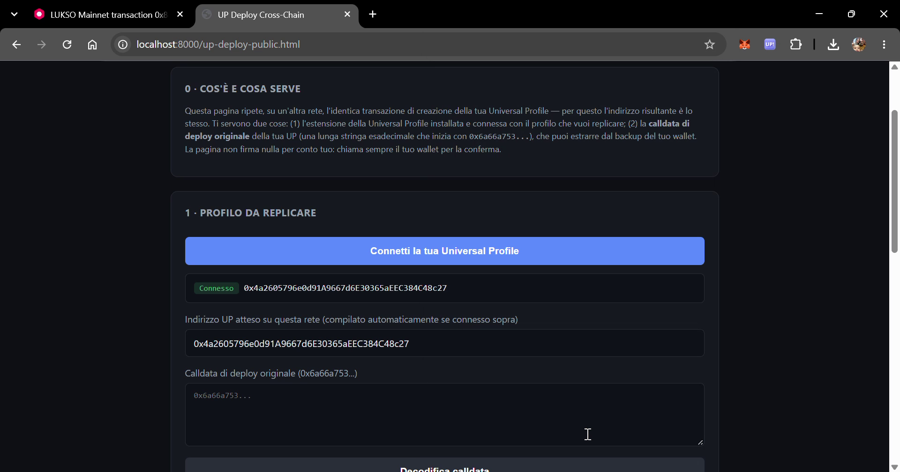
Once connected, your UP's address appears here — this is what the decoded calldata will be checked against.
5
Decode it and identify the controller
Paste the calldata you copied in step 3 into the same page. It will show you the address this calldata predicts for your UP on any chain, and — critically — it will decode and display every controller named in the calldata, including which one gets ALL_PERMISSIONS.
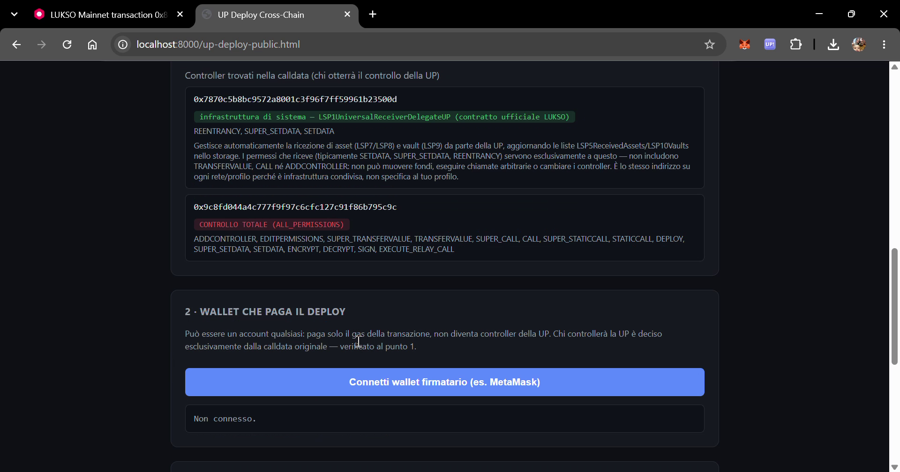
The tool separates known system infrastructure (green) from the actual controller with ALL_PERMISSIONS (red) — that second one is what you need to hold the key for.
Compare the predicted address to your actual UP address on LUKSO. They must match exactly before you go any further. If they don't, something is wrong with the calldata you copied — stop and re-check step 3.
6
Confirm it's the controller shown by your extension
The tool shows the address that receives ALL_PERMISSIONS — this is called the controller address, because it's the account that will control the profile after the deploy. The check to make here isn't generically "does this match the key I extracted" — it's whether this is the same account that your Universal Profile browser extension itself labels as the controller for this profile, and that this is the very account you extracted the private key from in step 1 (not a different one also sitting in the extension). If your Universal Profile has ever had more than one controller connected to it over time (for example, from reinstalling a wallet extension, or connecting a new device), make sure it's this specific controller — the one the extension shows for this profile — not just "a" controller that currently has access. They can look functionally identical (same permissions) while only one of them reproduces the same address on another chain.
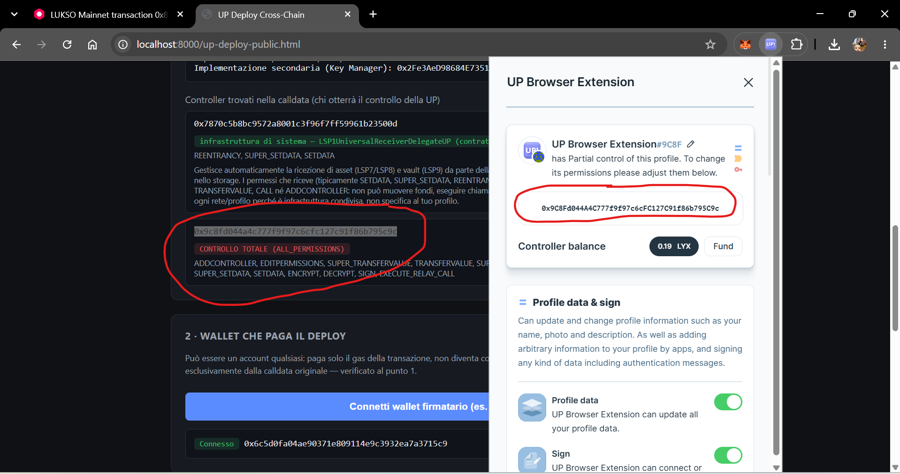
Cross-check: the ALL_PERMISSIONS address the tool found matches the address your own wallet extension shows as the controller of this specific profile — same string, character for character.
If the address doesn't match the controller shown by your extension, stop here. Proceeding without the right key means deploying a profile you won't be able to operate.
7
Deploy on the destination chain
Still on the Deploy tool: connect any wallet to pay gas (it does not need to be the controller — it only pays the transaction fee), select the destination network, and run the built-in checks. The tool verifies the predicted address again, checks nothing already exists there, estimates gas, and — after the transaction confirms — verifies the deployed bytecode matches exactly before calling it a success.
8
Operate your profile on the new chain
Import the private key you extracted in step 1 into MetaMask (or your wallet of choice) — this is standard "import account" functionality in any wallet. From there, use the Test tool to confirm the controller actually operates the profile — it writes a timestamp on-chain through the Key Manager and reads it back. Once that works, you can also use the Send tool to transfer native currency from the profile to another address, signed by that same controller.
Importing the key puts your whole profile inside that wallet. The same key also controls your profile on LUKSO, so a compromise of this wallet is a compromise of the profile everywhere.
- Import it into a dedicated wallet or browser profile, protected by a strong password, with no untrusted extensions installed — ideally not the wallet you use every day to connect to dApps.
- Before signing anything, check the network, the recipient and the amount shown in the wallet popup, not only on the page.
- Never sign requests you didn't start yourself, and disconnect sites you no longer use.
- When you no longer need to operate the profile from this wallet, remove the imported account from it.
💡 Funds: two addresses, both yours — don't forget the controller.
- Your UP address (the same on every chain) is your account. Send funds to it only after the deploy (step 7) and the test with the Test tool (step 8) have both succeeded. If something goes wrong — the wrong controller key, a failed deploy — funds sent earlier would stay stuck at that address.
- The controller address (the account you imported into MetaMask in step 8) is the key that signs. Every operation — test, transfer, anything — costs a small fee (gas), and the controller pays it, not the UP.
- 👉 So on the new chain send some funds to the controller too (e.g. POL on Polygon, ETH on Base or Arbitrum): at least enough for a few transactions. Without them the controller cannot sign anything, even if the UP is full.
One is a smart contract account (the UP), the other a normal wallet (the controller, an EOA): different addresses, but both under your control.
Two different connections, two different jobs — this trips people up. On the Test and Send tools, "Connect your Universal Profile" only reads your UP's address, on LUKSO, so you don't have to copy-paste it — no signature happens there. The wallet that actually operates the profile is the second connection, the "signing wallet" (MetaMask with the imported controller key), and it must be connected to the destination chain — the network where you redeployed the profile in steps 6–7 — not to LUKSO. It's completely normal to have both the UP extension and MetaMask active in the same browser at once: each one does a different job, on a different network. Both tools show you which network the signing wallet is currently on, right next to its address, and refuse to send anything if the wallet, the RPC and the network you selected are not the same chain — still, check it yourself before doing anything.
What these tools do — and don't do
- They never ask for a private key. The only thing you paste in is calldata — public on-chain data.
- Signing always happens in your own wallet (MetaMask or similar). These pages only prepare the transaction and hand it to your wallet for approval.
- They perform address and bytecode verification automatically, so a mistake in the calldata is caught before you sign, not after.
- They check that the signing wallet, the RPC and the selected network are the same chain before every transaction, and invalidate a previous check as soon as you change any input.
- They don't manage your keys, your backups, or your security — that responsibility stays entirely with you. If you're not confident distinguishing your own controllers or reading a block explorer, get help from someone who is before proceeding.
This is irreversible, self-directed on-chain activity. No one — including the tools linked here — can undo a deployment or a transfer once confirmed. Use a small amount of funds to test first, on a network where mistakes are cheap.
Tools
- Deploy — decode calldata, verify, and deploy a Universal Profile at its predicted address on another chain.
- Verify only — check whether a deploy already exists on another chain. It only reads public data from an RPC: no wallet is required, but you can optionally connect your Universal Profile to auto-fill the address it checks for, instead of typing it by hand.
- Test — confirm your controller can operate the deployed profile.
- Send — transfer native currency from the profile to another address.
- Publish implementation — if the Verify or Deploy tool reports that your profile's LSP0 or Key Manager implementation is missing on the target chain, publish it there at the same address, by replaying LUKSO's original deterministic deploy. Anyone can do it; it only costs gas.
Replicare una Universal Profile su altre chain EVM
Come deployare la tua Universal Profile LUKSO esistente allo stesso identico indirizzo su un'altra rete EVM — e perché funziona.
Di cosa si tratta. La tua Universal Profile (UP) è stata creata su LUKSO tramite un contratto factory deterministico. Poiché la factory è deployata allo stesso indirizzo su ogni rete EVM, ripetere esattamente la transazione di creazione originale su un'altra rete produce un contratto allo stesso indirizzo anche lì. Questa pagina spiega il meccanismo e guida attraverso il procedimento in sicurezza, usando gli strumenti collegati in fondo.
È una procedura tecnica. Presuppone dimestichezza con MetaMask, gli smart contract e la lettura di un block explorer. Non è un flusso consumer "a un click" e non va trattata come tale.
Come viene generato davvero l'indirizzo
Non è una semplice funzione di "controller + salt". La tua UP è stata creata tramite LSP23LinkedContractsFactory di LUKSO, deployata allo stesso indirizzo (0x2300000A84D25dF63081feAa37ba6b62C4c89a30) su ogni rete dove LUKSO l'ha pubblicata. La chiamata alla factory include:
- un salt iniziale,
- l'implementazione e i dati di inizializzazione del Key Manager (il secondo contratto collegato),
- l'indirizzo di un post-deployment module e la sua calldata — è qui che viene effettivamente specificato quale indirizzo riceve
ALL_PERMISSIONS sul nuovo profilo.
Tutto questo viene hashato insieme (keccak256) per formare il salt reale usato in CREATE2, combinato con l'hash del bytecode minimal-proxy che punta all'implementazione della Universal Profile. L'indirizzo risultante dipende dall'intera transazione originale — non da un singolo campo isolato.
Per questo solo la calldata originale esatta riproduce lo stesso indirizzo: il controller con il controllo totale non ha nulla di speciale in sé — è semplicemente l'indirizzo che quella specifica calldata già nomina. Cambiare la calldata (anche solo per nominare un controller diverso) produce un indirizzo completamente diverso.
Passo per passo
1
Estrai la tua chiave privata
Ti servirà più avanti, al passo 8, per operare il profilo sulla nuova rete — conviene toglierla di mezzo subito. Sblocca l'estensione Universal Profile, clicca sull'icona a rotella (Settings) in alto a destra, scorri fino in fondo alla sezione Developer e clicca Reveal private key. Inserisci la password dell'estensione quando richiesto: la chiave viene mostrata in chiaro.
Settings → scorri fino a "Developer" → "Reveal private key".
Questa chiave è il tuo profilo. Chi la possiede controlla la tua Universal Profile — su LUKSO e su ogni rete dove la rideployi — e può spostare tutti gli asset, cambiarne i controller e chiuderti fuori. Non esiste recupero e nessuno può annullare l'operazione.
- Non digitarla né incollarla mai in un sito web — compreso questo e gli strumenti collegati: nessuno di essi te la chiederà mai. L'unico posto dove va inserita è la schermata "importa account" del tuo wallet, al passo 8.
- Non inviarla mai a nessuno: né in chat, email, Telegram, Discord o ticket di assistenza. La vera assistenza (compresa la nostra) non chiederà mai una chiave privata, una seed phrase o una password di backup — chi lo fa sta cercando di rubarti i fondi.
- Non conservarla in chiaro: niente screenshot, foto, app di note, documenti, cloud o messaggi a te stesso. Tienila solo in un password manager oppure offline (su carta, in un luogo sicuro).
- Maneggiala solo su un dispositivo fidato: non su un computer condiviso o di lavoro, e senza condivisione schermo o sessioni di desktop remoto aperte. Dopo averla copiata, svuota gli appunti (copia qualcos'altro) e chiudi il pannello dell'estensione.
- Se pensi che sia stata esposta, agisci subito: sposta gli asset su un account sicuro e sostituisci il controller compromesso (aggiungine uno nuovo, poi rimuovi quello vecchio) su LUKSO e su ogni rete dove esiste il profilo — ogni rete ha i propri permessi, sistemarne una non protegge le altre.
2
Trova la transazione di creazione originale della tua UP
Apri l'indirizzo della tua UP sull'explorer di LUKSO mainnet, nella scheda Details. Trova la riga Creator — mostra l'indirizzo del creatore "at txn" seguito da un hash di transazione. Clicca su quel link dell'hash: ti porta direttamente alla transazione di creazione.
Nella scheda Details, il link "at txn" accanto a Creator è la scorciatoia diretta alla transazione di creazione — non serve scorrere l'elenco delle transazioni.
Una volta sulla pagina di quella transazione, passa alla scheda Raw trace.
La transazione di creazione: metodo deployERC1167Proxies, inviata all'indirizzo della factory. Da qui apri "Raw trace".
È dato pubblico on-chain. Non serve il file di backup del wallet né alcuna decrittazione per ottenerlo — chiunque può consultare la transazione di creazione di qualunque UP.
3
Copia l'input data della transazione
Nel raw trace, trova il campo call (l'esadecimale grezzo, che inizia con 0x6a66a753...). Copia l'intera stringa. Questa è la tua calldata di deploy.
Consiglio: fai doppio click in un punto qualsiasi della stringa esadecimale per selezionarla tutta, poi copia — molto più rapido che trascinare per selezionare una stringa così lunga.
Il raw trace: il campo call è la calldata di deploy.
4
Connetti la tua UP allo strumento di Deploy
Apri la pagina di Deploy e clicca Connetti la tua Universal Profile nel pannello 1. Approva la connessione nel popup dell'estensione — questo passaggio legge solo il tuo indirizzo, non chiede mai una chiave privata. Una volta connesso, lo strumento mostra il tuo indirizzo e precompila il campo "indirizzo atteso" con quello.
Una volta connesso, l'indirizzo della tua UP compare qui — è quello con cui verrà confrontata la calldata decodificata.
5
Decodificala e identifica il controller
Incolla la calldata copiata al passo 3 nella stessa pagina. Ti mostrerà l'indirizzo che questa calldata predice per la tua UP su qualsiasi rete e — punto cruciale — decodificherà e mostrerà ogni controller nominato nella calldata, incluso chi riceve ALL_PERMISSIONS.
Lo strumento separa l'infrastruttura di sistema nota (verde) dal vero controller con ALL_PERMISSIONS (rosso) — di quest'ultimo devi possedere la chiave.
Confronta l'indirizzo predetto con l'indirizzo reale della tua UP su LUKSO. Devono coincidere esattamente prima di andare oltre. Se non coincidono, c'è qualcosa che non va nella calldata copiata — fermati e ricontrolla il passo 3.
6
Conferma che sia il controller indicato dalla tua estensione
Lo strumento mostra l'indirizzo che riceve ALL_PERMISSIONS — si chiama indirizzo del controller, perché è l'account che controllerà il profilo dopo il deploy. Il confronto da fare non è genericamente "corrisponde alla chiave che ho estratto" — è se questo è lo stesso account che la tua estensione del browser Universal Profile indica esplicitamente come controller di questo profilo, e che sia proprio quell'account (non un altro presente nell'estensione) da cui hai estratto la chiave privata al passo 1. Se la tua Universal Profile ha mai avuto più di un controller collegato nel tempo (ad esempio dopo aver reinstallato un'estensione wallet, o collegato un nuovo dispositivo), assicurati che sia proprio questo controller — quello che l'estensione mostra per questo profilo — non semplicemente "un" controller che al momento ha accesso. Possono sembrare funzionalmente identici (stessi permessi) mentre solo uno dei due riproduce lo stesso indirizzo su un'altra rete.
Riscontro incrociato: l'indirizzo con ALL_PERMISSIONS trovato dallo strumento corrisponde all'indirizzo che la tua estensione wallet mostra come controller di questo specifico profilo — stessa stringa, carattere per carattere.
Se l'indirizzo non corrisponde al controller indicato dalla tua estensione, fermati qui. Andare avanti senza la chiave giusta equivale a deployare un profilo che non potrai gestire.
7
Deploya sulla rete di destinazione
Sempre sulla pagina di Deploy: collega un wallet qualsiasi per pagare il gas (non deve essere il controller — paga solo la commissione della transazione), scegli la rete di destinazione ed esegui i controlli integrati. Lo strumento riverifica l'indirizzo predetto, controlla che non esista già nulla lì, stima il gas e — dopo la conferma della transazione — verifica che il bytecode deployato corrisponda esattamente prima di dichiarare il successo.
8
Opera il tuo profilo sulla nuova rete
Importa in MetaMask (o nel wallet che preferisci) la chiave privata estratta al passo 1 — è la normale funzione "importa account" di qualsiasi wallet. Da lì usa la pagina di Test per confermare che il controller operi davvero il profilo — scrive un timestamp on-chain tramite il Key Manager e lo rilegge. Una volta verificato, puoi anche usare la pagina di Invio per trasferire valuta nativa dal profilo a un altro indirizzo, firmato dallo stesso controller.
Importare la chiave significa mettere l'intero profilo dentro quel wallet. La stessa chiave controlla il tuo profilo anche su LUKSO: se quel wallet viene compromesso, il profilo è compromesso ovunque.
- Importala in un wallet o profilo del browser dedicato, protetto da una password robusta e senza estensioni non affidabili — possibilmente non il wallet che usi ogni giorno per collegarti alle dApp.
- Prima di firmare qualsiasi cosa, controlla rete, destinatario e importo mostrati nel popup del wallet, non solo sulla pagina.
- Non firmare mai richieste che non hai avviato tu, e scollega i siti che non usi più.
- Quando non ti serve più operare il profilo da quel wallet, rimuovi l'account importato.
💡 I fondi: due indirizzi, tutti e due tuoi — non dimenticare il controller.
- L'indirizzo della tua UP (uguale su tutte le reti) è il tuo conto. Mandaci fondi solo dopo che il deploy (passo 7) e il test con la pagina di Test (passo 8) sono andati entrambi a buon fine. Se qualcosa va storto — chiave del controller sbagliata, deploy fallito — i fondi mandati prima resterebbero bloccati a quell'indirizzo.
- L'indirizzo del controller (l'account che hai importato in MetaMask al passo 8) è la chiave che firma. Ogni operazione — test, invio, qualsiasi cosa — costa una piccola commissione (gas), e la paga il controller, non la UP.
- 👉 Quindi sulla nuova rete manda un po' di fondi anche al controller (es. POL su Polygon, ETH su Base o Arbitrum): almeno quanto basta per qualche transazione. Senza, il controller non può firmare nulla, anche se la UP è piena.
Uno è un account smart contract (la UP), l'altro un normale wallet (il controller, un EOA): indirizzi diversi, ma tutti e due sotto il tuo controllo.
Due collegamenti diversi, due compiti diversi — qui è facile confondersi. Nelle pagine di Test e Invio, "Connetti la tua Universal Profile" serve solo a leggere l'indirizzo della tua UP, su LUKSO, così non devi copiarlo a mano — nessuna firma avviene in quel passaggio. Il wallet che opera davvero il profilo è il secondo collegamento, il "wallet firmatario" (MetaMask con la chiave del controller importata), e deve essere connesso alla rete di destinazione — quella dove hai rideployato il profilo ai passi 6–7 — non a LUKSO. È del tutto normale avere sia l'estensione UP che MetaMask attivi insieme nello stesso browser: ognuno fa un lavoro diverso, su una rete diversa. Entrambe le pagine mostrano su quale rete è connesso in questo momento il wallet firmatario, accanto al suo indirizzo, e si rifiutano di inviare qualsiasi cosa se wallet, RPC e rete selezionata non sono la stessa chain — controlla comunque tu stesso prima di fare qualsiasi cosa.
Cosa fanno questi strumenti — e cosa non fanno
- Non chiedono mai una chiave privata. L'unica cosa che incolli è la calldata — dato pubblico on-chain.
- La firma avviene sempre nel tuo wallet (MetaMask o simili). Queste pagine preparano solo la transazione e la passano al tuo wallet per l'approvazione.
- Eseguono automaticamente la verifica di indirizzo e bytecode, così un errore nella calldata viene intercettato prima della firma, non dopo.
- Prima di ogni transazione controllano che wallet firmatario, RPC e rete selezionata siano la stessa chain, e annullano una verifica precedente appena modifichi un dato.
- Non gestiscono le tue chiavi, i tuoi backup né la tua sicurezza — questa responsabilità resta interamente tua. Se non sei sicuro di distinguere i tuoi controller o di leggere un block explorer, fatti aiutare da chi lo sa fare prima di procedere.
Questa è un'attività on-chain irreversibile e autonoma. Nessuno — inclusi gli strumenti qui collegati — può annullare un deploy o un trasferimento una volta confermato. Prova prima con un importo piccolo, su una rete dove gli errori costano poco.
Strumenti
- Deploy — decodifica la calldata, verifica e deploya una Universal Profile all'indirizzo predetto su un'altra rete.
- Sola verifica — controlla se un deploy esiste già su un'altra rete. Legge solo dati pubblici da un RPC: non serve nessun wallet, ma puoi connettere facoltativamente la tua Universal Profile per compilare automaticamente l'indirizzo da controllare, invece di digitarlo a mano.
- Test — conferma che il tuo controller possa operare il profilo deployato.
- Invio — trasferisce valuta nativa dal profilo a un altro indirizzo.
- Pubblica implementazione — se la pagina di Verifica o di Deploy segnala che l'implementazione LSP0 o Key Manager del tuo profilo manca sulla rete di destinazione, la pubblica lì allo stesso indirizzo, ripetendo il deploy deterministico originale di LUKSO. Può farlo chiunque, costa solo gas.